
DIY Off Grid Shack Modified From a Shipping Container - Solar Powered Office, Tiny Home or Cabin
In this video, we will take you along as we convert this shipping container into a solar powered Off Grid Building!
This container will be used as an office-storage combo on an industrial asphalt site. We have modified this container using our bolt-on solutions without having to weld anything to the can.
If you are interested in building an off grid cabin, tiny home, garage, or hunting shack, you can easily do it yourself using our techniques and Container Modifications World’s products! All of the products we use on this container are DIY, and you can easily install them on your container.
The only products that we use that are best to keep to the experts are spray foam insulation and electrical. Watch this video as we install a door, skylight vents, windows and their protective covers, a propane heater, solar panels and steel stud framing!
Purchase Container Modification World Products Featured in The Video
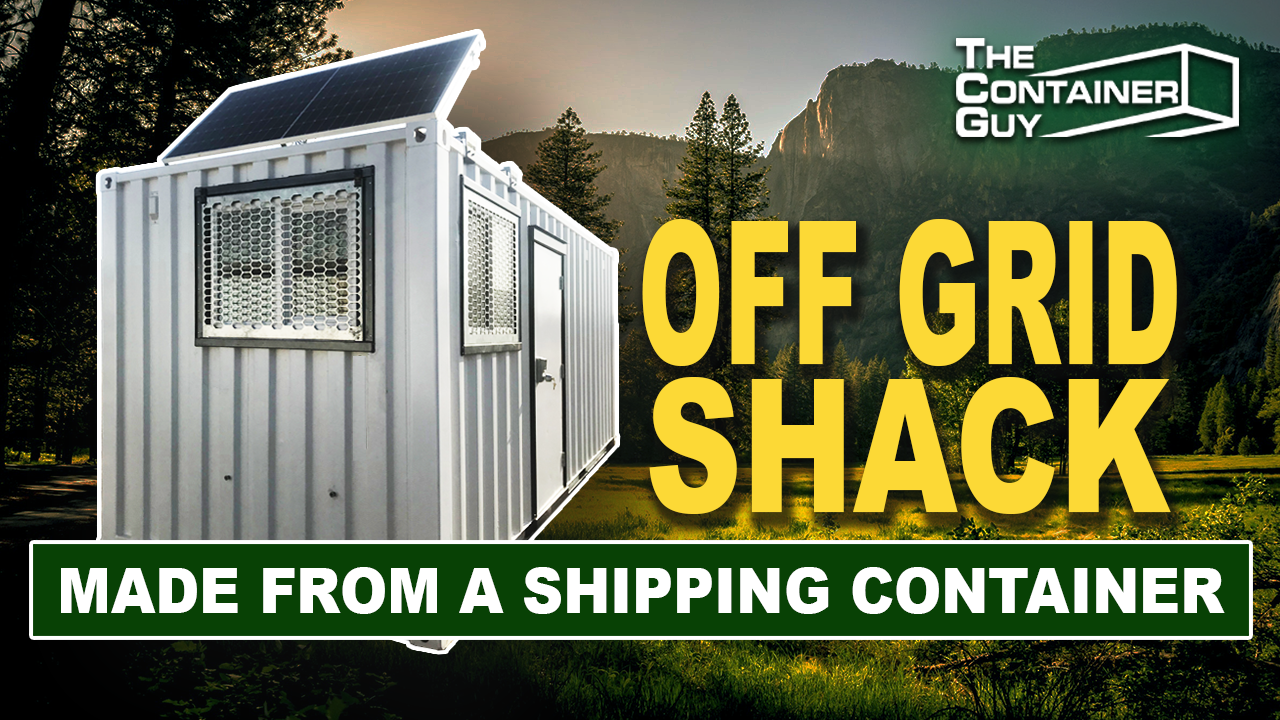
Building an Off-Grid Scale Shack from a 20-Foot Shipping Container
In this walkthrough, Channing McCorriston, The Container Guy, documents the full transformation of a 20-foot one-time-use shipping container into an off-grid scale shack for a remote gravel operation and asphalt plant.
Designed to function as both an office and storage space, this build integrates solar power, propane heating, insulation, and security features to create a rugged, energy-independent workspace.
Layout and Purpose
The container is divided into two sections.
The front half serves as the heated office and operator station, where scale tickets are processed and drivers interact through a service window. The rear half houses electrical panels, batteries, and general storage.
This separation allows the office to stay warm while minimizing heating demand on the storage side.
Exterior Modifications and Skylight Vents
Rough openings were cut for windows, doors, and skylight roof vents. After every cut, metal shards were thoroughly swept out to prevent future rust.
Skylight vents were installed and sealed with spray foam to prevent leaks. Although cutting holes in a container roof always introduces risk, proper sealing and insulation significantly reduce the chance of water intrusion.
The skylights dramatically improve natural lighting, making even the storage section bright during the day without relying on artificial light.
Security and Window Systems
The build uses weldless window framing kits along with custom security screens.
One standout feature is a drop-down security screen on the end-wall window. It uses piano hinges and gate-style latches, allowing the operator to open the window during the day for ventilation and close it securely at night.
Security is designed to deter casual intrusion rather than withstand heavy forced entry.
The main door features a mechanical lockset with keyed and password access, eliminating the need for batteries.
Framing and Insulation
Interior framing was completed using 2.5-inch steel studs. Metal furring strips were added to keep walls straight during spray foam application.
Spray foam insulation seals the container shell and provides thermal performance. A plywood-lined partition separates the heated office from the unheated storage area, improving energy efficiency.
The interior finish uses durable PVC reline wall panels that reflect light well and are easy to clean.
Forklift pocket covers were installed to contain spray foam, block pests, and improve the overall finish.
Off-Grid Heating
Heating is handled by a direct vent propane heater rated at 11,000 BTU.
This unit does not require electricity. It operates with a pilot light and igniter similar to an RV heater. A custom galvanized steel frame with mineral wool insulation and spray foam was built around the heater to meet clearance requirements.
The heater vents directly outside and protrudes about 5.5 inches beyond the container wall. While this slightly increases the container width, it provides reliable off-grid heating without electrical dependency.
Solar Power System
The off-grid electrical system includes:
-
One 380-watt solar panel mounted on the roof
-
Two 6-volt batteries wired in series for 12V DC power
-
An MPPT charge controller for efficient energy management
-
12V LED lighting fixtures throughout the office
Wiring runs through galvanized conduit for durability and future modifications. A master switch allows the entire 12V system to be shut down overnight to prevent battery drain.
Solar panels are mounted using Container Modification World CSM roof brackets. These bolt-on brackets avoid welding or penetrating the roof envelope, reducing the risk of leaks. Strut channels double as cable trays for clean wiring management.
The system is designed for low power demand, with optional 120V AC wiring available if grid connection is ever added.
Final Thoughts
This off-grid scale shack demonstrates how a standard shipping container can be converted into a functional, energy-independent industrial workspace.
By combining spray foam insulation, solar power, propane heating, modular brackets, and secure window systems, the build achieves durability, comfort, and practical performance in a remote environment.
The project also highlights a key principle in modern container modification: modular bolt-on components reduce fabrication time, preserve the container envelope, and simplify maintenance.
For industrial, recreational, or remote work applications, this approach offers a reliable blueprint for off-grid container builds.